Showing posts with label Guide. Show all posts

Wednesday, November 25, 2009

NXT-G 2.0 Alternatives – Remote Control

Many NXT users would enjoy the ability to control their creations remotely via a PC. The new NXT-G 2.0 software tries to cater for this segment of people by introducing a new in-program Remote Control (as discussed here). However, only people who own a NXT 2.0 Retail kit have access to this function – what about NXT 1.0 users? Lets have a look at a few alternatives found within BricxCC – a free LEGO MINDSTORMS programming suite created by John Hansen;


Brick Joystick (BricxCC Utility)
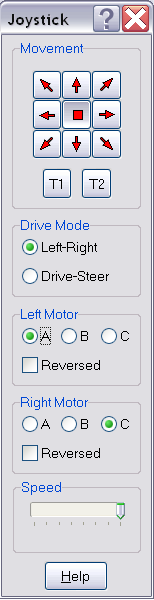
This program can be found within BricxCC - and NeXT Tools for Mac OS X - and allows users to control their robots using their PC’s mouse, keyboard, or even a joystick! The arrow buttons at the top control the direction that the robot will travel. Holding a left-click, or performing a single right click on one of these buttons will move your robot in that direction. You can also use the numeric pad found on the right side of your keyboard (with Numlock on) to control your robot; with all the program’s arrow buttons relative to the number ‘5’ keyboard button (the “Stop” function in this case). Ignore the ‘T1’ and ‘T2’ buttons at the moment – they only work on the RCX.

The box below the direction controls allows you to specify the type of steering, or ‘Drive Mode’, of your robot. The “Left-Right” function uses your robot’s left and right motors to move and steer, whilst the “Drive-Steer” function uses one motor on your robot to move forward and backward, and a second motor to steer the robot left and right. Select which steering design you have used in your robot to use the remote correctly.

The final three boxes allow you to control other aspects of the motors that control the movement of your robot. The “Left Motor/Drive Motor” and “Right Motor/Steer motor” (Left-Right/Drive-Steer modes) boxes allow you to set the Port Number and direction that your motors are facing. The Speed slider in the bottom box allows you to specify the speed that all of your motors will move at.

Remote (BricxCC Utility)

Another tool found within BricxCC and the Mac equivalent is the ‘Remote’ tool. This tool is useful if you wish to activate programs on the NXT while you control it remotely from your computer, or if you want more specific control over each motor (including the third motor inaccessible in the Brick Joystick program above). From the top of the remote down;

The message buttons are for the RCX and Scout bricks, so ignore them.

The ‘A’, ‘B’ and ‘C’ boxes control the motors of your robot (the letters refer to the motor ports). The buttons on the top of the sliders drive the selected motor forward, and the button on the bottom of the sliders will drive the selected motor backward. The actual sliders control the speed of each motor.

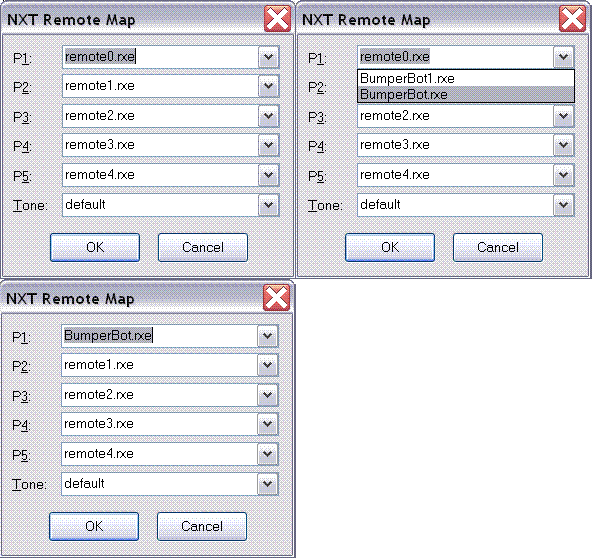
The five program buttons allow you to start a program currently on the NXT brick remotely. First of all, you need to map the programs with the program buttons. Right click any of the program buttons to open the “NXT Remote Map” window. Then click on the drop-down menus to select from a list of programs that must already be on the NXT brick. Click the ‘OK’ button to finalize your selections. Now you can left-click the mapped program buttons to start programs on the NXT!

The ‘Stop’ button stops the program currently running on the brick.

The ‘Tone’ button allows you to play a sound file on the NXT remotely. The default sound is a simple ‘beep’, but a NXT sound file can be mapped onto the button by following the same method as the ‘Program’ buttons. The sound files need to be on the NXT brick before you can select them. Left-clicking the ‘Tone’ button will play the selected sound file. Remember to turn the volume up on your NXT brick before you use this feature!

---------------------------------------------------------------------------------

These are just two other methods available for NXT users to operate their creations remotely. Both programs come free with John Hansen’s “BricxCC” and “NeXT Tools for Mac OS X” packages. Another alternative is to use a remote requiring Microsoft Robotics Studio – see Mathias Paul Scholz's website for more details.

Saturday, October 3, 2009

Review: LEGO MINDSTORMS NXT-G Programming Guide

Hey all, I recently got my hands on the LEGO MINDSTORMS NXT-G Programming Guide by Jim Kelly (author of the NXTStep Blog), and I thought I would share my thoughts on the book. I know it is a fairly old title (published in 2007) but the information it contains is still relevent to NXT-G programming today.

Jim Kelly provides information on all of the NXT-G programming blocks available in the NXT-G 1.x software (most of which is still relevent to NXT-G 2.0) as well as information on data-wires, creating MyBlocks, and a few mathematics equations, all presented in a language easily understood and enjoyed by the young target audience (10+). The author begins with an introduction to programming, the art of Psuedo code, and introduces a few simple programming terms throughout the book. I read the book from start to finish in less than a day (without doing the experiments and playing with NXT-G - which I would recommend doing while reading the book), and the information provided by Jim is easy to take in - it is not like reading a straight-to-the-facts guide, but eases the reader into the book through the use of friendly language - which actually made the book fun to read (for me, anyway). Even if you do not read the book chapters in chronological order, the book still makes a great guide and index for quickly finding the information you need. You will completely master what you have learned by creating and experimenting with the sample programs provided in the book, which also show the reader a few places where the programming blocks and your new skills can be used.

The content is very complete in terms of describing the functions of each programming block, and detailed graphics are used as the author explains the functions of the blocks. The chapters are short and full of knowledge on each programming block.

The graphics found in the book are a mixture of black and white photos (of SPOT - the robot used by the author to demonstrate and practice new programming skills on), a few block diagrams (see example below) as well as black and white screenshots of NXT-G (of EACH setting of EVERY programming block). The building instructions for SPOT can be found on the NXTStep (scroll down on the right side), as they are not printed in the book (opinions naturally vary on this), but the programming skills are VERY easily transfered to the reader's own robot.

There are, naturally, a few errors in the book, like the Appendix on the X/Y Co-ordinate system used by the Display block when drawing (the Y co-ordinate is described as the opposite of how it actually works, Y actually increases when moving upwards), but overall the book is a great guide for beginners to the NXT-G programming language, as well as teaching some expierienced NXT users a thing or two (How does the default Switch Block setting work and when is it used ;)).

In conclusion, I would definately recommend the book to the intended audience, and it is probably a great addition to a Father-Son team effort in learning about the MINDSTORMS NXT, as well as adults new to the NXT! The information has been described as being available on the internet and in the help files provided in NXT-G (Jim Kelly even tells the reader to use the help guides for finding out more about data-wire hubs), but if you are looking for a very readible book on NXT-G, a resource that you can continually use, and an introduction to useful programming skills, then this book is probably of worth to you.

Other Notes:
Sadly, the Errata found on the Apress (Publisher) site has not been used by the other reviewers who complain about the book, but any corrections you are looking for can probably be found on the NXTStep Forum board, where you can also ask the author any questions you have!

New NXT-G 2.0 Feautures not covered:

- Colour Sensor Block
- Initate Bluetooth Block
- Remote Control
- Sound Editor
- Image Editor
- Use of Floating Point Mathematics

Saturday, August 15, 2009

LEGO MINDSTORMS NXT-G 2.0 - Remote Control

One of the final new additions to NXT-G 2.0 is the internal Remote Control, lets have a look...


Preliminary Actions


Run NXT-G 2.0


The Remote Control


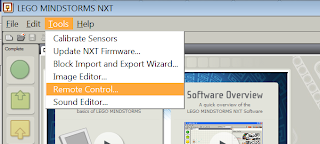
The Remote Control can be located under the 'Tools/Remote Control...' menu in the software package.

Click on this menu option to run the Remote Control. You will know it is loading if the image on the left appears in the middle of your screen.


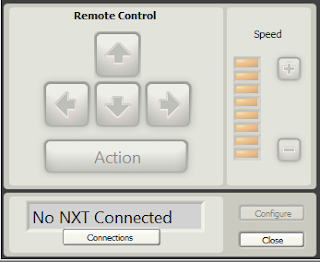
This window will appear - welcome to the Remote Control!

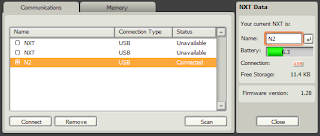
Click on the "Connetions" button to connect a NXT brick to the remote:


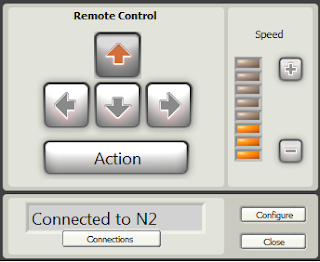
To control your robot, either press the buttons shown on-screen or press the corresponding buttons on your computer's keyboard. To change the speed of the movement motors, use the speed bar on the right of the Remote Control window, '+' will increase the speed, and '-' will decrease it.


Clicking on "Configure" will allow you to specify which motor ports will move the robot, the direction that the movement motors and action motor will rotate, as well as the power of the action motor.


Note that turning left or right will power BOTH the movement motors, while pressing 'Up' or 'Down' will power one of the movement motors. Therefore, the internal remote control in NXT-G 2.0 is best used for cars and other vehicles.


Lastly, you can run a program on the NXT brick while controling the robot from the Remote Control window!

Saturday, July 25, 2009

LEGO MINDSTORMS NXT-G 2.0 - Sound Editor

Another new addition to NXT-G 2.0 (the software that comes packed with LEGO MINDSTORMS NXT 2.0) is the Sound Editor Here is a quick guide to its functionality;

Preliminary Actions


Open NXT-G 2.0


Installed a computer Microphone correctly, and can confirm it works by using the Sound Recorder found in Start/Programs/Accessories/Sound Recorder (Example of the Windows 7 Sound Recorder below - you will be able to tell if you are recording if the green bar next to the time is moving).


The Sound Editor

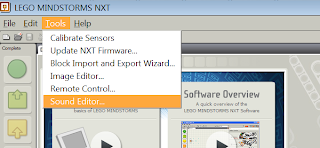
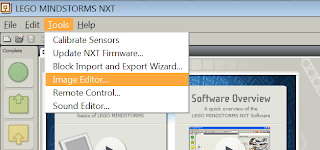
The Sound Editor can be located under the 'Tools/Sound Editor...' menu in the software package.


Click on this menu option to run the Sound Editor. You will know it is loading if the image on the left appears in the middle of your screen.


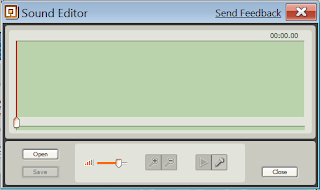
This window will appear - welcome to the Sound Editor!


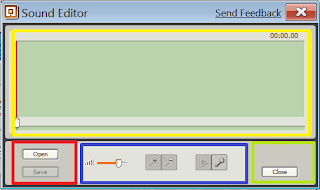
Below is an annotated screenshot of the Sound Editor window:

Yellow Box; The Waveform table. When you are recording waves will appear that show the peaks and and lows of noise level against the time taken for your recording.
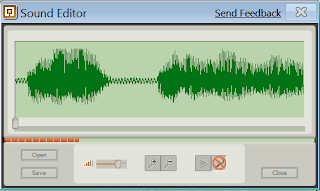

Red Box: This is where the 'Open' and 'Save' options can be accessed. You can open and save in the following formats:


-.RSO
-.WAV
-.MP3


Blue Box: This is where we can change the playback volume of our recording (Only effects the volume level when played back on your PC, and not the overall volume when played back on your NXT brick), zoom in and out of the waveform table (For precise cropping of your recording), and where we can start, stop and play our recording

Green Box: This is where we can close the Sound Editor. Make sure you save before closing.


Recording and Cropping

The Sound Editor will allow you to record for up to ten seconds, of which you will have to crop your wanted sound to under five seconds. while you are recording, the sound Editor will look something like this:


The red and white striped bar below the waveform table shows you how long you have been recording for, and how long you have left (approximately). Also, the recording icon will now have a red circle with a line through it, and its' function will change to 'stop recording'.
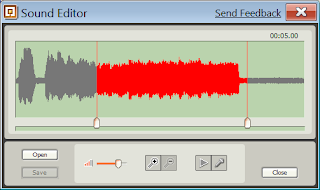
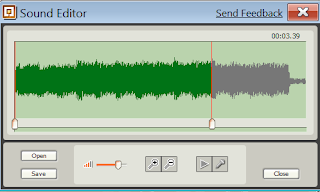
Crop your recording by dragging the two dividers found just below the waveform table to the beginning and end of your wanted selection. The same applies when you have imported a sound. An easy way to tell if you need to crop your recording is if the waves in the wavelength table are red. If your recording is of an acceptable length, the waves will be green, (See pictures below) and the 'Save' function will become active.


Zooming in and Out


Zooming in and out of the waveform table is a great way to help crop a file more precisely. Use the zoom keys (the magnifying glasses) to achieve this. At the standard zoom setting (when you open the Sound Editor) you can move the cropping dividers roughly along every two seconds of recording. When you zoom in, you can move the divider along every one second, achieveing a more accurate selection.


When you zoom in, the waveform table will keep the recording between the dividers in view.

Sunday, July 12, 2009

LEGO MINDSTORMS NXT-G 2.0 - Image Editor

Now I will have a look at the Image Editor included in NXT-G 2.0 (The software that is included in the LEGO MINSTORMS NXT 2.0 kit.)

Preliminary Actions

Run NXT-G 2.0

The Image Editor

The Image Editor can be located under the 'Tools/Image Editor...' menu in the software package.

Click on this menu option to run the Image Editor. You will know it is loading if the image on the left appears in the middle of your screen


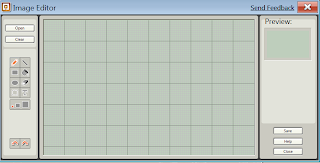
This window will appear - welcome to the Image Editor!

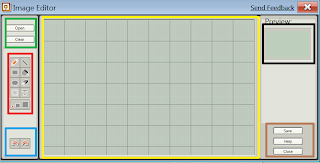
The Image Editor window can be divided into seven areas(Clipboard not shown):


Green Area: This is where we can import an image we would like to have on the NXT brick. The images will be converted into a grayscale format viewable on the NXT brick.
Red Area: This is similar to a MS Paint interface - each button is a different tool for creating/editing images. Notice that unlike Paint, there is no colour pallet - all images on the NXT will be shown in a 'Black and White' style. The tools available are

* Pencil: Allows you to draw freestyle
* Line: Allows you to draw a straight line
* Rectangle: Will help construct a rectangle/square in your image
* Fill: Will fill the desired area with black (Make sure there are no gaps in the edges - otherwise the fill will 'leak' into the rest of the image.
* Elipse: Will help you create a circle/oval shape in your image.
* Erase: Removes unwanted parts of your image.
* Clipboard: This tool will allow you to select an area in your image, by dragging a visible, dashed orange box over the area you would like to select (This can also be used just to select and move areas of your image that you have misplaced). Once selected, an extra area will appear in the Image Editor window, and you will be able to cut, copy, and paste your selection into other parts of your image.
* Text: This allows you to type letters and words you would like to appear in your image. If you begin typing in the middle of the image and your typing reaches the side of the editing area, the previous words will start moving towards the left of the editing area so you can fit more in. When your typing reaches both sides, you will be unable to type further on that line.
* Brush Size: This lets you choose the size of the editing brush (small/medium/large)

Blue Area: This is where the Undo and Redo opertaions can be controlled.
Yellow Area: The area where you can edit your image.
Black Area: This is where you image will be previewed as it will appear on your NXT's screen
Brown Area: This is where the 'Save', 'Help', and 'Close' operations are located.

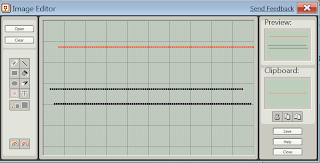
The clipboard window appears between the Black and Brown areas from the previous image (above)


When you are drawing in the editing area, what you are currently drawing before letting go of the left mouse button will be displayed in orange. This is also true when selecting areas of your image for the clipboard, and what you 'paste' into your image.

Compatable images that the editor can open are: .ric (Images created in NXT-G 2.0), .jpg, .jpeg, .png, and .bmp. To save an image as one of those formats, enter the .xxx ending after the filename. (This also works in NXT-G 2.0 if you would like to save the output as something other than .ric)

Useful Shortcuts:
(All shortcuts do not require you to press the '+' symbol)

Ctrl + O : Opens a window to browse for images you would like to import.
Ctrl + S : Save your image
Ctrl + H : Will open both a web browser window containing the help file for the editor, as well as a 'Context Window" - hovering your mouse above an item you are unsure about will result in information being shown in this window (Usually the name and possibly a description of the item you enquired about)
Ctrl + Z : Undo
Ctrl + X : "Cuts" a selected area
Ctrl + C : Copies a selected area into the clipboard
Ctrl + V : Pastes a selected area copied into the clipboard

Wednesday, July 8, 2009

LEGO MINDSTORMS NXT-G 2.0 - Installing the Software

Over the next few weeks, I will provide a few starting points for using the new features in NXT-G 2.0 (The software package that comes with the NXT 2.0 kit) To begin with, we will install the software onto a computer.

If you are familier with installing software, and/or the NXT in general, skip this guide.

Extra notes and troubleshooting advice can be found at the end of this guide - and will be added to if problems arise.

Preliminary Actions

First things first, NXT-G 2.0 is a software package that, once installed on your computer, will allow you to program your NXT brick. NXT 2.0 is the robotics kit you probably just purchased ;-), and the NXT is the white brick that came in your kit which controls your creations.

We will install the software by following the on-screen installation popups.

To keep things simple, check that your computer has the minimum specifications required by right-clicking the "My Computer" icon on your desktop and selecting "Properties" from the drop down menu. The minimum requirements the software needs to run can be found on the front side of the NXT 2.0 box and on the back of the CD wallet your software came packaged in.

If your computer meets the minimum requirements, insert the MINDSTORMS NXT 2.0 CD that came with your NXT-2.0 kit into your computer's CD/DVD/Blu-ray drive.

For this guide I will be using a Windows XP Home Edition operating system.

Installing the Software

To begin the installation, the software should auto-run once the CD has been inserted into the drive. If it does not auto-run, open "My Computer", right-click the "LEGO MINDSTORMS NXT 2.0" drive, and select "Autorun" from the menu options.

IF a popup appears asking for a password, you may not have administrator privilages on your account. Ask the administrator to enter the password to continue the installation.

All going well, an installation window will appear asking you to select one of the following languages; German, English, French, or Danish. Select your language and the install window will disappear.


Another installation window will appear. This one will have a loading bar near the bottom 'initializing' the setup of the NXT-G 2.0 software. Then, a "Features" window will appear. In general, install both the software and the NXT device driver. Below this is the area where you can change the install directory.


Click 'next' once you have decided on your settings.


Now the License agreement appears. Change the selection to 'Yes I accept the License agreement(s)' when you are satisfied.


After accepting, the "Start Installation" window will appear. This window will tell you what the installer will do. If you are upgrading from NXT-G 1, you will be told it is upgrading. If you have already installed NXT-G 2.0 and forgot, it will say no actions will be taken!


When you click 'Next', the software will install onto your computer. This may take anything between under 5 minutes to 10 minutes depending on your settings and computer specs. Finally, click the 'Finish' button to complete the installation!


Now open NXT-G 2.0. A shortcut should have been placed in your "Start/Programs/LEGO MINDSTORMS NXT 2.0" folder, and on your desktop.


The loading screen will appear and...


You have successfully installed NXT-G 2.0!


Notes:

Preliminary Actions:

* The software will not prevent you from installing it on a PC that does not meet the minimum specs, however your experience with the software will be effected - it will probably be VERY slow.
* The NXT-G 2.0 software is packaged as a CD
* I have also successfully installed NXT-G 2.0 on Windows Server 2003 Standard Edition and Windows 7 Evaluation Edition (Build 7000) - but LEGO will probably not offer support if your installation messes your computer up if you are using these operating systems.
* NXT-G 2.0 will upgrade over an existing NXT-G installation if you have installed it, if you would like to keep your existing NXT-G install, choose a different install folder by "Browsing" for it in the "Features" installation window.
* You may need to restart your computer once your installation is complete.

Installing the Software
* Registration is not compulsary, and all features of NXT-G 2.0 will be active upon install.
* Registration can also be completed through the NXT-G 2.0 software's 'Help' menu.

Troubleshoot

* If the 'Browse' option on the "Features" install window is grayed out, you have already installed NXT-G 2.0 on your computer