Showing posts with label Image. Show all posts

Sunday, August 30, 2009

What's the difference - NXT-G 2.0 Image Formats

The LEGO MINDSTORMS NXT-G 2.0 software allows users to easily open, edit, and save images in a variety of formats, but what is the difference between formats? Why does it matter if I save an image as a .jpg file instead of a .ric file? Prepare to be enlightened...

(If you are just interested in the straight forward facts, skip down to the conclusion of this post)

First of all, no matter which format you save images as through NXT-G 2.0, the result will almost be the same! Only differences in the size of the file may effect a common computer user - have a look at the table below...


(On this table "Empty Image" means I didn't add anything to the image before saving, and "Full Image means I completely blackened my image before saving - all images saved using the Image Editor in NXT-G 2.0)


As you can see, .bmp images are the largest files at 19.8 Kilobytes (kb), and .jpg files are the smallest size at only 742 bytes! However, every image file except .jpg files have a constant size, for as you can see from my table, only the .jpg file changes in size between a full and empty image. Interestingly enough, .jpg files change in size depending on where the blackened areas are in the image, causing the .jpg file size to alter from around 741 bytes to around 2.5 Kilobytes. But considering how much disk space our computers have, who needs to worry!


Note: These image sizes are for images on a Windows XP
computer
. The size of an image on the NXT is 0.9
Kilobytes (around 900 bytes).


The NXT only displays .ric files, and any imported image will need to be saved as a .ric file before you can use it on the NXT. Once saved as a .ric file, you can use your image through a Display Block:


Note: All images saved through NXT-G 2.0 will be saved to the folder:

C:\Program Files\LEGO
Software
\
LEGO MINDSTORMS NXT\engine\Pictures

where the red writing represemts where you installed NXT-G 2.0 to if you changed any settings during installation.

All images created in the NXT-G 2.0 Image Editor have 100 x 64 pixel dimensions (width by height)

What should I use on my computer?

The .ric files are only useful for users downloading them to their NXT brick. What happens if you want to see what image you are downloading beforehand? You internet browser does not support viewing .ric files, so that leaves .jpg, .png, and .bmp files - which is best? The image file size table shown at the beginning of this post outlined the... file sizes, but what about other differences? Here are some other facts about using images on your computer:

JPG/JPEG
* Use on: Photographs, Realistic Drawings
* Bad results on: Line and Letter Drawings
* Loses detail after every edit - becomes more blurred (check it out using MS paint or similar - on large images, as the .ric files do not show this effect))

PNG
* Use on: Line and Letter Drawings, Clipart, Computer Image Scans (E.g. When using an external scanner to load a piece of paper onto your computer)
* Bad results on: Photographs, Full colour images
* Doesn't lose detail after every edit

All of the above files formats are easily distibuted on the internet as well, as every internet browser can view them.

BMP
* Larger Files

RIC
* NXT-only file, distribute only to other NXT-G 2.0 users, or users with other software supporting .ric files (more to come on this)
* Web browsers will not view them - require download and import into NXT-G 2.0 or other supportive software

More info can be found on the web, a good, simple, but helpful website can be found here:

http://toolkit.crispen.org/formats/index.html

So, in conclusion:

* The NXT can only display .ric images
* No image viewers support .ric files - including internet browsers
* Once an image is saved as a .ric file through the NXT-G 2.0 Image Editor, it can be displayed on the NXT using a Display Block
* Images saved using the NXT-G 2.0 Image Editor can be located on your computer under the LEGO MINDSTORMS NXT\engine\Pictures directory where you installed NXT-G 2.0
* Images created in the NXT-G 2.0 Image Editor have 100 x 64 pixel dimensions
* On the XXT brick, .ric files are about 900 bytes in size

* On your computer, .JPG files have the smallest image size, and .bmp has the largest file size
* Saving an image used on the NXT as any other image file type will not change the content of the picture
* For big images on your computer, .jpg files should be photographs, and png pictures should be text and line drawings
* .JPG files with large dimensions will lose detail and become blurred after every saved edit

Sunday, July 12, 2009

LEGO MINDSTORMS NXT-G 2.0 - Image Editor

Now I will have a look at the Image Editor included in NXT-G 2.0 (The software that is included in the LEGO MINSTORMS NXT 2.0 kit.)

Preliminary Actions

Run NXT-G 2.0

The Image Editor

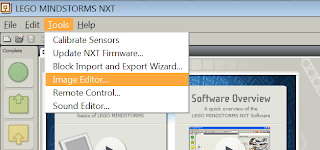
The Image Editor can be located under the 'Tools/Image Editor...' menu in the software package.

Click on this menu option to run the Image Editor. You will know it is loading if the image on the left appears in the middle of your screen


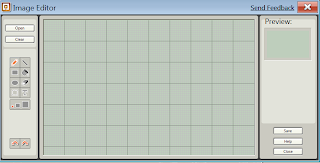
This window will appear - welcome to the Image Editor!

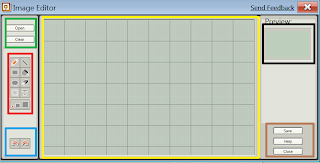
The Image Editor window can be divided into seven areas(Clipboard not shown):


Green Area: This is where we can import an image we would like to have on the NXT brick. The images will be converted into a grayscale format viewable on the NXT brick.
Red Area: This is similar to a MS Paint interface - each button is a different tool for creating/editing images. Notice that unlike Paint, there is no colour pallet - all images on the NXT will be shown in a 'Black and White' style. The tools available are

* Pencil: Allows you to draw freestyle
* Line: Allows you to draw a straight line
* Rectangle: Will help construct a rectangle/square in your image
* Fill: Will fill the desired area with black (Make sure there are no gaps in the edges - otherwise the fill will 'leak' into the rest of the image.
* Elipse: Will help you create a circle/oval shape in your image.
* Erase: Removes unwanted parts of your image.
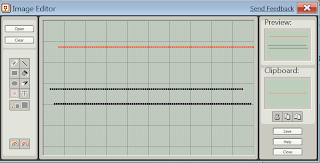
* Clipboard: This tool will allow you to select an area in your image, by dragging a visible, dashed orange box over the area you would like to select (This can also be used just to select and move areas of your image that you have misplaced). Once selected, an extra area will appear in the Image Editor window, and you will be able to cut, copy, and paste your selection into other parts of your image.
* Text: This allows you to type letters and words you would like to appear in your image. If you begin typing in the middle of the image and your typing reaches the side of the editing area, the previous words will start moving towards the left of the editing area so you can fit more in. When your typing reaches both sides, you will be unable to type further on that line.
* Brush Size: This lets you choose the size of the editing brush (small/medium/large)

Blue Area: This is where the Undo and Redo opertaions can be controlled.
Yellow Area: The area where you can edit your image.
Black Area: This is where you image will be previewed as it will appear on your NXT's screen
Brown Area: This is where the 'Save', 'Help', and 'Close' operations are located.

The clipboard window appears between the Black and Brown areas from the previous image (above)


When you are drawing in the editing area, what you are currently drawing before letting go of the left mouse button will be displayed in orange. This is also true when selecting areas of your image for the clipboard, and what you 'paste' into your image.

Compatable images that the editor can open are: .ric (Images created in NXT-G 2.0), .jpg, .jpeg, .png, and .bmp. To save an image as one of those formats, enter the .xxx ending after the filename. (This also works in NXT-G 2.0 if you would like to save the output as something other than .ric)

Useful Shortcuts:
(All shortcuts do not require you to press the '+' symbol)

Ctrl + O : Opens a window to browse for images you would like to import.
Ctrl + S : Save your image
Ctrl + H : Will open both a web browser window containing the help file for the editor, as well as a 'Context Window" - hovering your mouse above an item you are unsure about will result in information being shown in this window (Usually the name and possibly a description of the item you enquired about)
Ctrl + Z : Undo
Ctrl + X : "Cuts" a selected area
Ctrl + C : Copies a selected area into the clipboard
Ctrl + V : Pastes a selected area copied into the clipboard