Hey all, here is a quick update about some exciting new NXT and Power Functions gear coming in 2010 via LEGO Education:
* NXT 2.0 Color sensor to be released!
* NXT DC Power pack and charger!!
Full details at: http://technicbricks.blogspot.com/2009/12/lego-education-2010-update.html
Wednesday, December 2, 2009
Wednesday, November 25, 2009
NXT-G 2.0 Alternatives – Remote Control
Many NXT users would enjoy the ability to control their creations remotely via a PC. The new NXT-G 2.0 software tries to cater for this segment of people by introducing a new in-program Remote Control (as discussed here). However, only people who own a NXT 2.0 Retail kit have access to this function – what about NXT 1.0 users? Lets have a look at a few alternatives found within BricxCC – a free LEGO MINDSTORMS programming suite created by John Hansen;

Brick Joystick (BricxCC Utility)
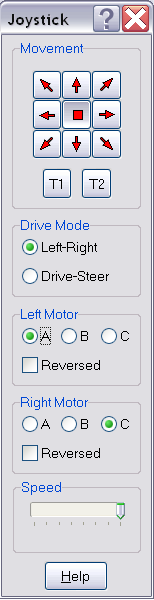 This program can be found within BricxCC - and NeXT Tools for Mac OS X - and allows users to control their robots using their PC’s mouse, keyboard, or even a joystick! The arrow buttons at the top control the direction that the robot will travel. Holding a left-click, or performing a single right click on one of these buttons will move your robot in that direction. You can also use the numeric pad found on the right side of your keyboard (with Numlock on) to control your robot; with all the program’s arrow buttons relative to the number ‘5’ keyboard button (the “Stop” function in this case). Ignore the ‘T1’ and ‘T2’ buttons at the moment – they only work on the RCX.
The box below the direction controls allows you to specify the type of steering, or ‘Drive Mode’, of your robot. The “Left-Right” function uses your robot’s left and right motors to move and steer, whilst the “Drive-Steer” function uses one motor on your robot to move forward and backward, and a second motor to steer the robot left and right. Select which steering design you have used in your robot to use the remote correctly.
The final three boxes allow you to control other aspects of the motors that control the movement of your robot. The “Left Motor/Drive Motor” and “Right Motor/Steer motor” (Left-Right/Drive-Steer modes) boxes allow you to set the Port Number and direction that your motors are facing. The Speed slider in the bottom box allows you to specify the speed that all of your motors will move at.
Remote (BricxCC Utility)
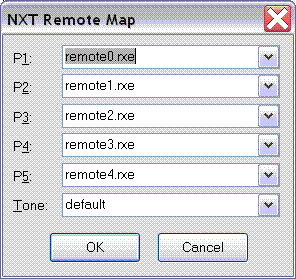
 Another tool found within BricxCC and the Mac equivalent is the ‘Remote’ tool. This tool is useful if you wish to activate programs on the NXT while you control it remotely from your computer, or if you want more specific control over each motor (including the third motor inaccessible in the Brick Joystick program above). From the top of the remote down;
The message buttons are for the RCX and Scout bricks, so ignore them.
The ‘A’, ‘B’ and ‘C’ boxes control the motors of your robot (the letters refer to the motor ports). The buttons on the top of the sliders drive the selected motor forward, and the button on the bottom of the sliders will drive the selected motor backward. The actual sliders control the speed of each motor.
The five program buttons allow you to start a program currently on the NXT brick remotely. First of all, you need to map the programs with the program buttons. Right click any of the program buttons to open the “NXT Remote Map” window. Then click on the drop-down menus to select from a list of programs that must already be on the NXT brick. Click the ‘OK’ button to finalize your selections. Now you can left-click the mapped program buttons to start programs on the NXT!
The ‘Stop’ button stops the program currently running on the brick.
The ‘Tone’ button allows you to play a sound file on the NXT remotely. The default sound is a simple ‘beep’, but a NXT sound file can be mapped onto the button by following the same method as the ‘Program’ buttons. The sound files need to be on the NXT brick before you can select them. Left-clicking the ‘Tone’ button will play the selected sound file. Remember to turn the volume up on your NXT brick before you use this feature!
---------------------------------------------------------------------------------
These are just two other methods available for NXT users to operate their creations remotely. Both programs come free with John Hansen’s “BricxCC” and “NeXT Tools for Mac OS X” packages. Another alternative is to use a remote requiring Microsoft Robotics Studio – see Mathias Paul Scholz's website for more details.
Tuesday, November 24, 2009
Updates, Updates...
Hey all, I'm back and I thought I'd update everyone (including myself!) on whats been happening over the last few weeks;

1) Updated MINDSTORMS Website
The MINDSTORMS website has been upgraded with a flashy new layout and a few new features; including a dedicated Bonus Models page, and a "funzone" segment. The new colour scheme matches that of the NXT 2.0 kit, but with the update comes a few buggy or slow menus which will hopefully be fixed in the near future. NXTLog has also been upgraded (although remaining as NXTLog 2.0).
2) LDD 3.0
LDD is closely intergrated with the MINDSTORMS line of products as a way of users to share their models with others, and with the upgrade from LEGO Factory to LEGO DesignBy Me comes the latest updates for this free CAD software. The new NXT 2.0 parts have been added amoungst a few new cool features, including an upgraded hinge tool and a compatability mode to help LDraw users convert their models for use in LDD.
3) Bonus Model #4: Stonehenge
The NXT 2.0 bonus models keep coming with the latest created by Philo. His model "Stonehenge" is now available on the MINDSTORMS website (See above picture for a peek at it)
4) The NXTStep
The NXTStep contributors have been on fire over the last few weeks with multiple posts nearly everyday. Have a look at a number of articles on converting between NXT kits here, and look through the archives if you missed anything else!
5) Philo's Color Sensor Comparison
Philo created an amazing but simple to understand comparison of the LEGO Color Sensor and HiTechnic Color Sensor, describing the strengths and weaknesses of both. This article can be found here
Sunday, October 11, 2009
The Unofficial LEGO MINDSTORMS NXT Book Repository
Hey all, this will be one of the last blog posts from me for about a month - yes, its exam time again!
If you are looking for information on MINDSTORMS NXT books, a great place to look for a list of most of the titles published over the last few years can be found at booksnbots.com.
This site is run by David J. Perdue author of:
* The Unofficial LEGO MINDSTORMS NXT Inventor's Guide,
* Competitive MINDSTORMS (a book on RCX Sumo robots)
* and the upcoming Unofficial LEGO MINDSTORMS NXT 2.0 Inventor's Guide.
The site has most of the NXT books that have been published up to 2009, and I expect it will be updated again soon.
Summary of Latest NXT Books:
LEGO MINDSTORMS NXT 2.0: The King's Treasure
James Floyd Kelly
http://www.apress.com/book/view/9781430224914
The LEGO MINDSTORMS NXT Discovery/Adventure Book
Laurens Valk
http://nostarch.com/nxtadventure.htm and http://oreilly.com/catalog/9781593272111
LEGO MINDSTORMS NXT Thinking Robots
Daniele Benedettelli
http://www.amazon.com/LEGO-MINDSTORMS-NXT-Thinking-Robots/dp/1593272162
The Art of NXT-G Programming
Terry Griffin
http://nostarch.com/nxt-g.htm
The Unofficial LEGO MINDSTORMS NXT 2.0 Inventor's Guide
David J. Perdue
http://nostarch.com/nxtig2.htm
Friday, October 9, 2009
More ways to store your LEGO!
Hey all, here are two more (similar) methods for storing all of your LEGO!
1) Recycling old Boxes
If you have many old boxes formerly used for carrying such items as paper (maybe look around school or offices for any spares) you can easily adapt them for storing bricks and models. Use more tape and card to create compartments for seperating parts! If you have the origional but tattered box for your model, you could even cut out the faces and stick them to the top of your box to remind you which model pieces are inside!

2) Use Organising Boxes/Transfer Cases
 If you are looking for a low cost and easy solution for storing LEGO, you could purchase a few organising boxes/transfer cases to quickly and easily store your bricks. Use a vivid or stick-on labels to name your boxes if they contain the parts used in one of your LEGO models only.
1) Recycling old Boxes
If you have many old boxes formerly used for carrying such items as paper (maybe look around school or offices for any spares) you can easily adapt them for storing bricks and models. Use more tape and card to create compartments for seperating parts! If you have the origional but tattered box for your model, you could even cut out the faces and stick them to the top of your box to remind you which model pieces are inside!
2) Use Organising Boxes/Transfer Cases
 If you are looking for a low cost and easy solution for storing LEGO, you could purchase a few organising boxes/transfer cases to quickly and easily store your bricks. Use a vivid or stick-on labels to name your boxes if they contain the parts used in one of your LEGO models only.
Tuesday, October 6, 2009
A few new things at HiTechnic...
Hey all, here's a quick update on the latest HiTechnic actuivity:
Sensor Multiplexer (sMUX)

The long awaited Sensor Multiplexer has arrived! We first saw this product on the HiTechnic Development page before it was scrapped, and now the dream of many has become a reality! My main query is whether or not the new product will live up to the hype surrounding it - I see it being useful to the tertiary student/teacher community, but general users will probably remain unphased by the new release, it really depends on how many sensors you own and if you can create a model that uses them all! Still, I can't wait to see someone create an amazing robot using this!
Xander over at NXTasy has posted a list of the sensors that the sMUX supports, as well as a brighter picture of the multiplexer here.
Price: USD$57.95
IRReceiver
 Another addition from a few weeks back is the IRReceiver. This sensor allows users to use the #8879 Power Functions IR Speed Remote Control or the #8885 Power Functions IR Remote Control to interact with your NXT creations! From the HiTechnic website:
Price: USD$49.95
IR Beacon
 Not much to say on this; here is HiTechnic's description:
This product is only available to FTC (First Tech Challenge) competitiors. If you are looking for an IR emiitting device, HiTechnic have an IR Ball (USD$79.95!!) usually used for robot soccer competitions. There are loads of other (cheaper) options as well if you are good at electronics (or want to learn quick!)
Price: USD$27.00
Building Instructions!
Another new addition I just noticed is the Building Instructions menu tab! HiTechnic have stated that they will release models with building instructions and sample programs every few weeks. So far, the Ball Shooter has been released, which requires a NXT 2.0 kit and a Hitechnic Acceleration Sensor to build.
Sensor Multiplexer (sMUX)

The long awaited Sensor Multiplexer has arrived! We first saw this product on the HiTechnic Development page before it was scrapped, and now the dream of many has become a reality! My main query is whether or not the new product will live up to the hype surrounding it - I see it being useful to the tertiary student/teacher community, but general users will probably remain unphased by the new release, it really depends on how many sensors you own and if you can create a model that uses them all! Still, I can't wait to see someone create an amazing robot using this!
Xander over at NXTasy has posted a list of the sensors that the sMUX supports, as well as a brighter picture of the multiplexer here.
Price: USD$57.95
IRReceiver
 Another addition from a few weeks back is the IRReceiver. This sensor allows users to use the #8879 Power Functions IR Speed Remote Control or the #8885 Power Functions IR Remote Control to interact with your NXT creations! From the HiTechnic website:
The IRReceiver decodes commands from a Power Functions Remote Control and your NXT program can use the commands to directly control NXT motors or to control other functions in your program.
Price: USD$49.95
IR Beacon
The IR Beacon for the FTC Hot Shot game generates Infrared (IR) signals to assist in target alignment. The IR Beacon signals can be accurately detected with the HiTechnic IRSeeker sensor. For more details refer to the FTC Hit Shot Game Manual.
This product is only available to FTC (First Tech Challenge) competitiors. If you are looking for an IR emiitting device, HiTechnic have an IR Ball (USD$79.95!!) usually used for robot soccer competitions. There are loads of other (cheaper) options as well if you are good at electronics (or want to learn quick!)
Price: USD$27.00
Building Instructions!
Another new addition I just noticed is the Building Instructions menu tab! HiTechnic have stated that they will release models with building instructions and sample programs every few weeks. So far, the Ball Shooter has been released, which requires a NXT 2.0 kit and a Hitechnic Acceleration Sensor to build.
Saturday, October 3, 2009
Review: LEGO MINDSTORMS NXT-G Programming Guide
 Hey all, I recently got my hands on the LEGO MINDSTORMS NXT-G Programming Guide by Jim Kelly (author of the NXTStep Blog), and I thought I would share my thoughts on the book. I know it is a fairly old title (published in 2007) but the information it contains is still relevent to NXT-G programming today.
Jim Kelly provides information on all of the NXT-G programming blocks available in the NXT-G 1.x software (most of which is still relevent to NXT-G 2.0) as well as information on data-wires, creating MyBlocks, and a few mathematics equations, all presented in a language easily understood and enjoyed by the young target audience (10+). The author begins with an introduction to programming, the art of Psuedo code, and introduces a few simple programming terms throughout the book. I read the book from start to finish in less than a day (without doing the experiments and playing with NXT-G - which I would recommend doing while reading the book), and the information provided by Jim is easy to take in - it is not like reading a straight-to-the-facts guide, but eases the reader into the book through the use of friendly language - which actually made the book fun to read (for me, anyway). Even if you do not read the book chapters in chronological order, the book still makes a great guide and index for quickly finding the information you need. You will completely master what you have learned by creating and experimenting with the sample programs provided in the book, which also show the reader a few places where the programming blocks and your new skills can be used.
The content is very complete in terms of describing the functions of each programming block, and detailed graphics are used as the author explains the functions of the blocks. The chapters are short and full of knowledge on each programming block.
The graphics found in the book are a mixture of black and white photos (of SPOT - the robot used by the author to demonstrate and practice new programming skills on), a few block diagrams (see example below) as well as black and white screenshots of NXT-G (of EACH setting of EVERY programming block). The building instructions for SPOT can be found on the NXTStep (scroll down on the right side), as they are not printed in the book (opinions naturally vary on this), but the programming skills are VERY easily transfered to the reader's own robot.
 There are, naturally, a few errors in the book, like the Appendix on the X/Y Co-ordinate system used by the Display block when drawing (the Y co-ordinate is described as the opposite of how it actually works, Y actually increases when moving upwards), but overall the book is a great guide for beginners to the NXT-G programming language, as well as teaching some expierienced NXT users a thing or two (How does the default Switch Block setting work and when is it used ;)).
In conclusion, I would definately recommend the book to the intended audience, and it is probably a great addition to a Father-Son team effort in learning about the MINDSTORMS NXT, as well as adults new to the NXT! The information has been described as being available on the internet and in the help files provided in NXT-G (Jim Kelly even tells the reader to use the help guides for finding out more about data-wire hubs), but if you are looking for a very readible book on NXT-G, a resource that you can continually use, and an introduction to useful programming skills, then this book is probably of worth to you.
Other Notes:
Sadly, the Errata found on the Apress (Publisher) site has not been used by the other reviewers who complain about the book, but any corrections you are looking for can probably be found on the NXTStep Forum board, where you can also ask the author any questions you have!
New NXT-G 2.0 Feautures not covered:
- Colour Sensor Block
- Initate Bluetooth Block
- Remote Control
- Sound Editor
- Image Editor
- Use of Floating Point Mathematics
Thursday, September 24, 2009
NXTLog Snap Bot Building Challenge
 Hey all, a quick update: The NXTLog Snap Lock Building Challenge is out! The aim of this challenge is to build a robot using the least amount of parts possible - see main details below:
Main Challenge Details:
* Make a robot using the least amount of parts possible
* Robot must fit into one of four catergories:
Animals
Humanoid
Machines
Vehicles
* You may enter from Tuesday September 1, 2009 – Saturday October 31, 2009
* All projects must be tagged: snapbot
* Usual NXTLog terms apply - the judging criteria can be found on the official NXTLog page using the link at the end of this post
I will upload and post about the robot I have built for this challenge this weekend!
--> NXTLog Snap Bot Challenge Page
LA
Tuesday, September 8, 2009
LEGO®'s Fairplay Policy
Every now and then you might ask yourself "what can I not do when posting about LEGO?" If you want to keep your unofficial LEGO (MINDSTORMS) website acceptable in The LEGO Group's eyes, and enjoy reading about Law, you may like to read their Fairplay Policy:
--> LEGO®'s Fairplay Policy
And here's an example of LEGO disciplining their guidlines:
--> Holly-Wood CAD Site
Better posts to come ;-)
LA
--> LEGO®'s Fairplay Policy
And here's an example of LEGO disciplining their guidlines:
--> Holly-Wood CAD Site
Better posts to come ;-)
LA
Thursday, September 3, 2009
LEGO MINDSTORMS NXT-G 2.0 - Importing Images
Continuing on from my last post on Image formats supported by NXT-G 2.0, and my post on the Image Editor found in the software, I will now look at importing pictures into the Image Editor for use on the NXT brick.
Importing Images
Once you have installed and opened NXT-G 2.0 and started the Image Editor, you will find this screen on your computer:
.PNG)
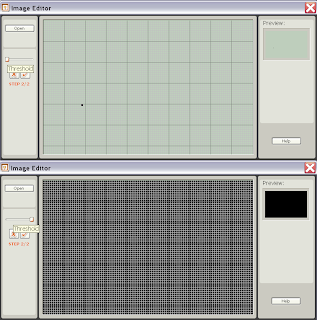
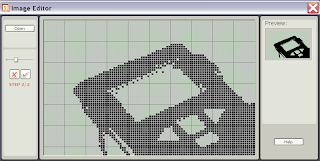
Sliding the "Threshold bar" to the left (Top picture) will make the image as light as possible, so only the darkest features of your image will be shown, and sliding the bar to the right (bottom image) makes the image as dark as possible, only showing the lightest details of your image - or pure black. Remember, at this point your image has been converted to a black and white image, and changing the threshold level will let you decide which details of you image will be shown and which details will be removed from the image. Play around until you find the suitable threshold for your image - usually this is around the middle of the "Treshold Bar", which coincidentally is the default setting for imported images in NXT-G 2.0. Here is my imported image;
.PNG)
Clicking the "Tick" box will complete the process, and allow you to edit your imported image using the standard tools.
Importing Images
Once you have installed and opened NXT-G 2.0 and started the Image Editor, you will find this screen on your computer:
 By clicking on the "Open" button, we will get the option to choose which image on our computer we would like to import for use on our NXT bricks. These images can be full colour, as the software will automatically convert it to a black and white image after we perform a series of actions:
Image Size
After selecting an image, the image will be imported into the Image Editor screen and we will first have the opportunity to change the size of the image using the magnifying glass icons - called Step One in the software. You can cancel the import at anytime by clicking the "X" button located just below the Magnifying Glass icons - See the images below;
.PNG) Click the 'tick' button when you are happy with the size of your image. Your image will then be converted to a black and white image, and you will be directed to Step Two - chnaging the threshold of the image. Rather than trying to explain what this means for those who are not aware of thresholds, I created the following quick image to show its' effects.
Click the 'tick' button when you are happy with the size of your image. Your image will then be converted to a black and white image, and you will be directed to Step Two - chnaging the threshold of the image. Rather than trying to explain what this means for those who are not aware of thresholds, I created the following quick image to show its' effects.
Sliding the "Threshold bar" to the left (Top picture) will make the image as light as possible, so only the darkest features of your image will be shown, and sliding the bar to the right (bottom image) makes the image as dark as possible, only showing the lightest details of your image - or pure black. Remember, at this point your image has been converted to a black and white image, and changing the threshold level will let you decide which details of you image will be shown and which details will be removed from the image. Play around until you find the suitable threshold for your image - usually this is around the middle of the "Treshold Bar", which coincidentally is the default setting for imported images in NXT-G 2.0. Here is my imported image;
Clicking the "Tick" box will complete the process, and allow you to edit your imported image using the standard tools.
.PNG) Remember to save your image as a .ric file if you want to use it on your NXT Brick.
Remember to save your image as a .ric file if you want to use it on your NXT Brick.
And thats it!
Note: Image I used is from The LEGO Group:
http://shop.lego.com/Product/?p=10287
Sunday, August 30, 2009
What's the difference - NXT-G 2.0 Image Formats
The LEGO MINDSTORMS NXT-G 2.0 software allows users to easily open, edit, and save images in a variety of formats, but what is the difference between formats? Why does it matter if I save an image as a .jpg file instead of a .ric file? Prepare to be enlightened...
(If you are just interested in the straight forward facts, skip down to the conclusion of this post)
First of all, no matter which format you save images as through NXT-G 2.0, the result will almost be the same! Only differences in the size of the file may effect a common computer user - have a look at the table below...

BMP
* Larger Files
RIC
* NXT-only file, distribute only to other NXT-G 2.0 users, or users with other software supporting .ric files (more to come on this)
* Web browsers will not view them - require download and import into NXT-G 2.0 or other supportive software
More info can be found on the web, a good, simple, but helpful website can be found here:
http://toolkit.crispen.org/formats/index.html
So, in conclusion:
(If you are just interested in the straight forward facts, skip down to the conclusion of this post)
First of all, no matter which format you save images as through NXT-G 2.0, the result will almost be the same! Only differences in the size of the file may effect a common computer user - have a look at the table below...

As you can see, .bmp images are the largest files at 19.8 Kilobytes (kb), and .jpg files are the smallest size at only 742 bytes! However, every image file except .jpg files have a constant size, for as you can see from my table, only the .jpg file changes in size between a full and empty image. Interestingly enough, .jpg files change in size depending on where the blackened areas are in the image, causing the .jpg file size to alter from around 741 bytes to around 2.5 Kilobytes. But considering how much disk space our computers have, who needs to worry!
Note: These image sizes are for images on a Windows XP
computer. The size of an image on the NXT is 0.9
Kilobytes (around 900 bytes).
The NXT only displays .ric files, and any imported image will need to be saved as a .ric file before you can use it on the NXT. Once saved as a .ric file, you can use your image through a Display Block:
Note: All images saved through NXT-G 2.0 will be saved to the folder:
C:\Program Files\LEGO
Software\LEGO MINDSTORMS NXT\engine\Pictures
where the red writing represemts where you installed NXT-G 2.0 to if you changed any settings during installation.
All images created in the NXT-G 2.0 Image Editor have 100 x 64 pixel dimensions (width by height)
What should I use on my computer?
The .ric files are only useful for users downloading them to their NXT brick. What happens if you want to see what image you are downloading beforehand? You internet browser does not support viewing .ric files, so that leaves .jpg, .png, and .bmp files - which is best? The image file size table shown at the beginning of this post outlined the... file sizes, but what about other differences? Here are some other facts about using images on your computer:
JPG/JPEG
* Use on: Photographs, Realistic Drawings
* Bad results on: Line and Letter Drawings
* Loses detail after every edit - becomes more blurred (check it out using MS paint or similar - on large images, as the .ric files do not show this effect))
PNG
* Use on: Line and Letter Drawings, Clipart, Computer Image Scans (E.g. When using an external scanner to load a piece of paper onto your computer)
* Bad results on: Photographs, Full colour images
* Doesn't lose detail after every edit
BMP
* Larger Files
RIC
* NXT-only file, distribute only to other NXT-G 2.0 users, or users with other software supporting .ric files (more to come on this)
* Web browsers will not view them - require download and import into NXT-G 2.0 or other supportive software
More info can be found on the web, a good, simple, but helpful website can be found here:
http://toolkit.crispen.org/formats/index.html
So, in conclusion:
* The NXT can only display .ric images
* No image viewers support .ric files - including internet browsers
* Once an image is saved as a .ric file through the NXT-G 2.0 Image Editor, it can be displayed on the NXT using a Display Block
* Images saved using the NXT-G 2.0 Image Editor can be located on your computer under the LEGO MINDSTORMS NXT\engine\Pictures directory where you installed NXT-G 2.0
* Images created in the NXT-G 2.0 Image Editor have 100 x 64 pixel dimensions
* On the XXT brick, .ric files are about 900 bytes in size
* On your computer, .JPG files have the smallest image size, and .bmp has the largest file size
* Saving an image used on the NXT as any other image file type will not change the content of the picture
* For big images on your computer, .jpg files should be photographs, and png pictures should be text and line drawings
* .JPG files with large dimensions will lose detail and become blurred after every saved edit
Saturday, August 29, 2009
Interger Blocks in NXT-G 2.0
 Steve Hassenplug over at TeamHassenplug.org has found a solution to using Interger programming blocks from NXT-G 1.x software in the new NXT-G 2.0 software. NXT-G 2.0 uses Floating Point math blocks unlike previous versions of the software, however Interger blocks are also installed but not available in the programming palletes. First of all, Whats the difference?.. Read On:
Interger Calculations
- E.g. 5, 10, 100, 5567
- Round Number results
- No decimal points
- NXT-G 1.0/1.1
Floating Point Calculations
- E.g. 5.97667, 9547.9767,
- Decimal points
- Large numbers that cannot be represented as intergers
- NXT-G 2.0
Quoting TeamHassenplug:
To add them (Interger Maths Blocks) to a pallet, simply create an empty file in the BlockRegistry directory, in the pallet sub-directory, with the name of the block and a .txt extension.
Ex: [LEGO MINDSTORMS
directory]\engine\EditorVIs\BlockRegistry\Data\Numeric Operations.txt
The list of available blocks is located in: [LEGO MINDSTORMS
directory]\engine\vi.lib\LEGO\Blocks
--> Steve Hassenplug's Solution
Thursday, August 20, 2009
LEGO Education Constructopedia
 Hey all, for those of us who are interested in the mechanical design behind some of the great LEGO creations that have appeared throughout the year, and if you have not already done so, check out the LEGO Education Constructopedia. There are some great diagrams and explanations on simple ways we can improve our design skills with the use of gears and pulleys, including compound gearing, changing pully direction and speed, idler gears, and a few other topics which create the 11 pages of engineering tips and tricks.
Saturday, August 15, 2009
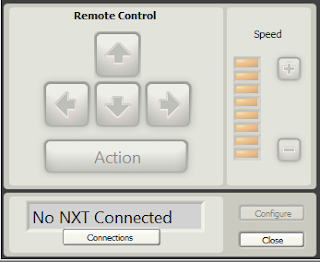
LEGO MINDSTORMS NXT-G 2.0 - Remote Control
One of the final new additions to NXT-G 2.0 is the internal Remote Control, lets have a look...

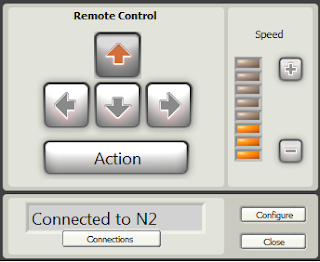
 Click on this menu option to run the Remote Control. You will know it is loading if the image on the left appears in the middle of your screen.
.png)
Click on the "Connetions" button to connect a NXT brick to the remote: 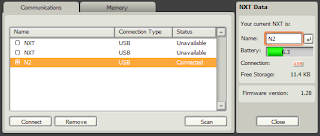
Preliminary Actions
Run NXT-G 2.0
The Remote Control
The Remote Control can be located under the 'Tools/Remote Control...' menu in the software package.
 Click on this menu option to run the Remote Control. You will know it is loading if the image on the left appears in the middle of your screen.
This window will appear - welcome to the Remote Control!
Click on the "Connetions" button to connect a NXT brick to the remote:
.png)
To control your robot, either press the buttons shown on-screen or press the corresponding buttons on your computer's keyboard. To change the speed of the movement motors, use the speed bar on the right of the Remote Control window, '+' will increase the speed, and '-' will decrease it.
Clicking on "Configure" will allow you to specify which motor ports will move the robot, the direction that the movement motors and action motor will rotate, as well as the power of the action motor.

Note that turning left or right will power BOTH the movement motors, while pressing 'Up' or 'Down' will power one of the movement motors. Therefore, the internal remote control in NXT-G 2.0 is best used for cars and other vehicles.
Lastly, you can run a program on the NXT brick while controling the robot from the Remote Control window!
Tuesday, August 4, 2009
Project: Lunar Mineral Sorter (LMS) - Static
 This year hosted the celebration of the first moon landing on the 20th July 1969, as well as the release of NXT 2.0 on the 1st August 2009! The LMS (Lunar Mineral Sorter) - Static Edition combines these two events into one NXTLog project buildable using one NXT 2.0 kit!To enhance the collection of available knowledge findable on the Moon, the LMS - SE was designed. once launched from the base shuttle, this stationary robot searches for minerals/rock samples (it can rotate up to 90 degrees left or right), lowers a mechanical arm and grabs the object, followed by scanning the object using the colour sensor to check if it is the object wanted by scientists back on Earth. If so, it is collected, and further objects are searched for. The LMS - SE can collect and hold up to 3 rock samples (aka: zamor balls).
Improvements
--------------------------
* Add a counter-weight onto the claw/grabber
* Possibly reduce the weight of the claw
More information, including CAD and Program files, will be added on the NXTLog page for this project over the next few weeks!
http://mindstorms.lego.com/nxtlog/ProjectDisplay.aspx?id=9ae21e33-e40d-4250-bc99-c24e02b5d7c0
NXTasy Forum Discussion
http://forums.nxtasy.org/index.php?showtopic=4051
Saturday, July 25, 2009
LEGO MINDSTORMS NXT-G 2.0 - Sound Editor
 Another new addition to NXT-G 2.0 (the software that comes packed with LEGO MINDSTORMS NXT 2.0) is the Sound Editor Here is a quick guide to its functionality;
Preliminary Actions
Open NXT-G 2.0
Installed a computer Microphone correctly, and can confirm it works by using the Sound Recorder found in Start/Programs/Accessories/Sound Recorder (Example of the Windows 7 Sound Recorder below - you will be able to tell if you are recording if the green bar next to the time is moving).

The Sound Editor
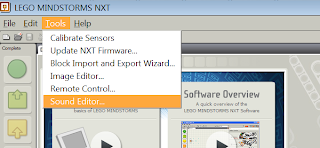
The Sound Editor can be located under the 'Tools/Sound Editor...' menu in the software package.
The Sound Editor can be located under the 'Tools/Sound Editor...' menu in the software package.
 Click on this menu option to run the Sound Editor. You will know it is loading if the image on the left appears in the middle of your screen.
This window will appear - welcome to the Sound Editor!
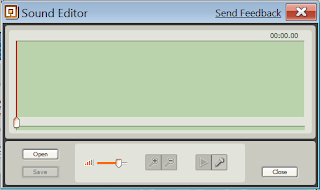
Below is an annotated screenshot of the Sound Editor window:
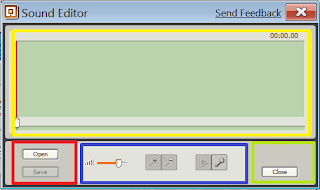 Yellow Box; The Waveform table. When you are recording waves will appear that show the peaks and and lows of noise level against the time taken for your recording.
Red Box: This is where the 'Open' and 'Save' options can be accessed. You can open and save in the following formats:
-.RSO
-.WAV
-.MP3
Blue Box: This is where we can change the playback volume of our recording (Only effects the volume level when played back on your PC, and not the overall volume when played back on your NXT brick), zoom in and out of the waveform table (For precise cropping of your recording), and where we can start, stop and play our recording
Green Box: This is where we can close the Sound Editor. Make sure you save before closing.
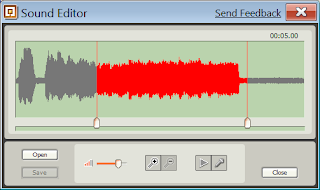
Recording and Cropping
The Sound Editor will allow you to record for up to ten seconds, of which you will have to crop your wanted sound to under five seconds. while you are recording, the sound Editor will look something like this:
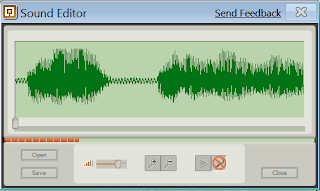 The red and white striped bar below the waveform table shows you how long you have been recording for, and how long you have left (approximately). Also, the recording icon will now have a red circle with a line through it, and its' function will change to 'stop recording'.
Crop your recording by dragging the two dividers found just below the waveform table to the beginning and end of your wanted selection. The same applies when you have imported a sound. An easy way to tell if you need to crop your recording is if the waves in the wavelength table are red. If your recording is of an acceptable length, the waves will be green, (See pictures below) and the 'Save' function will become active.

Zooming in and Out
Zooming in and out of the waveform table is a great way to help crop a file more precisely. Use the zoom keys (the magnifying glasses) to achieve this. At the standard zoom setting (when you open the Sound Editor) you can move the cropping dividers roughly along every two seconds of recording. When you zoom in, you can move the divider along every one second, achieveing a more accurate selection.
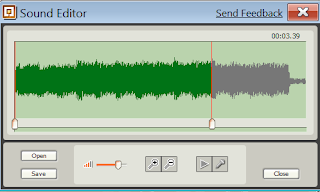
When you zoom in, the waveform table will keep the recording between the dividers in view.
Sunday, July 12, 2009
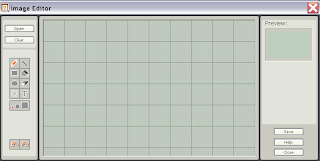
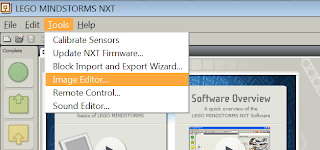
LEGO MINDSTORMS NXT-G 2.0 - Image Editor
Now I will have a look at the Image Editor included in NXT-G 2.0 (The software that is included in the LEGO MINSTORMS NXT 2.0 kit.)
 Click on this menu option to run the Image Editor. You will know it is loading if the image on the left appears in the middle of your screen
.png)
Ctrl + S : Save your image
Ctrl + H : Will open both a web browser window containing the help file for the editor, as well as a 'Context Window" - hovering your mouse above an item you are unsure about will result in information being shown in this window (Usually the name and possibly a description of the item you enquired about)
Ctrl + Z : Undo
Ctrl + X : "Cuts" a selected area
Ctrl + C : Copies a selected area into the clipboard
Ctrl + V : Pastes a selected area copied into the clipboard
The Image Editor
The Image Editor can be located under the 'Tools/Image Editor...' menu in the software package.
 Click on this menu option to run the Image Editor. You will know it is loading if the image on the left appears in the middle of your screen
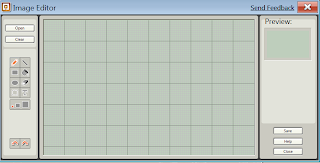
This window will appear - welcome to the Image Editor!
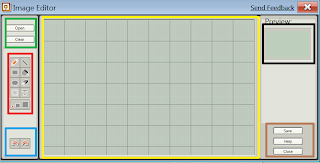
The Image Editor window can be divided into seven areas(Clipboard not shown):
Green Area: This is where we can import an image we would like to have on the NXT brick. The images will be converted into a grayscale format viewable on the NXT brick.
Red Area: This is similar to a MS Paint interface - each button is a different tool for creating/editing images. Notice that unlike Paint, there is no colour pallet - all images on the NXT will be shown in a 'Black and White' style. The tools available are
* Pencil: Allows you to draw freestyle
* Line: Allows you to draw a straight line
* Rectangle: Will help construct a rectangle/square in your image
* Fill: Will fill the desired area with black (Make sure there are no gaps in the edges - otherwise the fill will 'leak' into the rest of the image.
* Elipse: Will help you create a circle/oval shape in your image.
* Erase: Removes unwanted parts of your image.
* Clipboard: This tool will allow you to select an area in your image, by dragging a visible, dashed orange box over the area you would like to select (This can also be used just to select and move areas of your image that you have misplaced). Once selected, an extra area will appear in the Image Editor window, and you will be able to cut, copy, and paste your selection into other parts of your image.
* Text: This allows you to type letters and words you would like to appear in your image. If you begin typing in the middle of the image and your typing reaches the side of the editing area, the previous words will start moving towards the left of the editing area so you can fit more in. When your typing reaches both sides, you will be unable to type further on that line.
* Brush Size: This lets you choose the size of the editing brush (small/medium/large)
Blue Area: This is where the Undo and Redo opertaions can be controlled.
Yellow Area: The area where you can edit your image.
Black Area: This is where you image will be previewed as it will appear on your NXT's screen
Brown Area: This is where the 'Save', 'Help', and 'Close' operations are located.
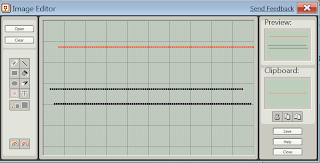
The clipboard window appears between the Black and Brown areas from the previous image (above)
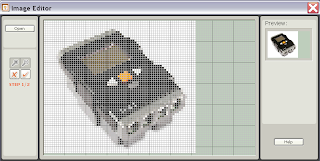
When you are drawing in the editing area, what you are currently drawing before letting go of the left mouse button will be displayed in orange. This is also true when selecting areas of your image for the clipboard, and what you 'paste' into your image.
Compatable images that the editor can open are: .ric (Images created in NXT-G 2.0), .jpg, .jpeg, .png, and .bmp. To save an image as one of those formats, enter the .xxx ending after the filename. (This also works in NXT-G 2.0 if you would like to save the output as something other than .ric)Useful Shortcuts:
(All shortcuts do not require you to press the '+' symbol)
Ctrl + S : Save your image
Ctrl + H : Will open both a web browser window containing the help file for the editor, as well as a 'Context Window" - hovering your mouse above an item you are unsure about will result in information being shown in this window (Usually the name and possibly a description of the item you enquired about)
Ctrl + Z : Undo
Ctrl + X : "Cuts" a selected area
Ctrl + C : Copies a selected area into the clipboard
Ctrl + V : Pastes a selected area copied into the clipboard
Wednesday, July 8, 2009
LEGO MINDSTORMS NXT-G 2.0 - Installing the Software
Over the next few weeks, I will provide a few starting points for using the new features in NXT-G 2.0 (The software package that comes with the NXT 2.0 kit) To begin with, we will install the software onto a computer.


Notes:
Preliminary Actions:
* The software will not prevent you from installing it on a PC that does not meet the minimum specs, however your experience with the software will be effected - it will probably be VERY slow.
* The NXT-G 2.0 software is packaged as a CD
* I have also successfully installed NXT-G 2.0 on Windows Server 2003 Standard Edition and Windows 7 Evaluation Edition (Build 7000) - but LEGO will probably not offer support if your installation messes your computer up if you are using these operating systems.
* NXT-G 2.0 will upgrade over an existing NXT-G installation if you have installed it, if you would like to keep your existing NXT-G install, choose a different install folder by "Browsing" for it in the "Features" installation window.
* You may need to restart your computer once your installation is complete.
Installing the Software
* Registration is not compulsary, and all features of NXT-G 2.0 will be active upon install.
* Registration can also be completed through the NXT-G 2.0 software's 'Help' menu.
Troubleshoot
* If the 'Browse' option on the "Features" install window is grayed out, you have already installed NXT-G 2.0 on your computer
If you are familier with installing software, and/or the NXT in general, skip this guide.
Extra notes and troubleshooting advice can be found at the end of this guide - and will be added to if problems arise.
Preliminary Actions
First things first, NXT-G 2.0 is a software package that, once installed on your computer, will allow you to program your NXT brick. NXT 2.0 is the robotics kit you probably just purchased ;-), and the NXT is the white brick that came in your kit which controls your creations.
We will install the software by following the on-screen installation popups.
To keep things simple, check that your computer has the minimum specifications required by right-clicking the "My Computer" icon on your desktop and selecting "Properties" from the drop down menu. The minimum requirements the software needs to run can be found on the front side of the NXT 2.0 box and on the back of the CD wallet your software came packaged in.
If your computer meets the minimum requirements, insert the MINDSTORMS NXT 2.0 CD that came with your NXT-2.0 kit into your computer's CD/DVD/Blu-ray drive.
For this guide I will be using a Windows XP Home Edition operating system.
Installing the Software
To begin the installation, the software should auto-run once the CD has been inserted into the drive. If it does not auto-run, open "My Computer", right-click the "LEGO MINDSTORMS NXT 2.0" drive, and select "Autorun" from the menu options.
IF a popup appears asking for a password, you may not have administrator privilages on your account. Ask the administrator to enter the password to continue the installation.
All going well, an installation window will appear asking you to select one of the following languages; German, English, French, or Danish. Select your language and the install window will disappear.
Another installation window will appear. This one will have a loading bar near the bottom 'initializing' the setup of the NXT-G 2.0 software. Then, a "Features" window will appear. In general, install both the software and the NXT device driver. Below this is the area where you can change the install directory.


Click 'next' once you have decided on your settings.
Now the License agreement appears. Change the selection to 'Yes I accept the License agreement(s)' when you are satisfied.


After accepting, the "Start Installation" window will appear. This window will tell you what the installer will do. If you are upgrading from NXT-G 1, you will be told it is upgrading. If you have already installed NXT-G 2.0 and forgot, it will say no actions will be taken!

When you click 'Next', the software will install onto your computer. This may take anything between under 5 minutes to 10 minutes depending on your settings and computer specs. Finally, click the 'Finish' button to complete the installation!


Now open NXT-G 2.0. A shortcut should have been placed in your "Start/Programs/LEGO MINDSTORMS NXT 2.0" folder, and on your desktop.

The loading screen will appear and...
You have successfully installed NXT-G 2.0!
Notes:
Preliminary Actions:
* The software will not prevent you from installing it on a PC that does not meet the minimum specs, however your experience with the software will be effected - it will probably be VERY slow.
* The NXT-G 2.0 software is packaged as a CD
* I have also successfully installed NXT-G 2.0 on Windows Server 2003 Standard Edition and Windows 7 Evaluation Edition (Build 7000) - but LEGO will probably not offer support if your installation messes your computer up if you are using these operating systems.
* NXT-G 2.0 will upgrade over an existing NXT-G installation if you have installed it, if you would like to keep your existing NXT-G install, choose a different install folder by "Browsing" for it in the "Features" installation window.
* You may need to restart your computer once your installation is complete.
Installing the Software
* Registration is not compulsary, and all features of NXT-G 2.0 will be active upon install.
* Registration can also be completed through the NXT-G 2.0 software's 'Help' menu.
Troubleshoot
* If the 'Browse' option on the "Features" install window is grayed out, you have already installed NXT-G 2.0 on your computer
Subscribe to:
Posts (Atom)


