Sunday, August 30, 2009

What's the difference - NXT-G 2.0 Image Formats

The LEGO MINDSTORMS NXT-G 2.0 software allows users to easily open, edit, and save images in a variety of formats, but what is the difference between formats? Why does it matter if I save an image as a .jpg file instead of a .ric file? Prepare to be enlightened...

(If you are just interested in the straight forward facts, skip down to the conclusion of this post)

First of all, no matter which format you save images as through NXT-G 2.0, the result will almost be the same! Only differences in the size of the file may effect a common computer user - have a look at the table below...


(On this table "Empty Image" means I didn't add anything to the image before saving, and "Full Image means I completely blackened my image before saving - all images saved using the Image Editor in NXT-G 2.0)


As you can see, .bmp images are the largest files at 19.8 Kilobytes (kb), and .jpg files are the smallest size at only 742 bytes! However, every image file except .jpg files have a constant size, for as you can see from my table, only the .jpg file changes in size between a full and empty image. Interestingly enough, .jpg files change in size depending on where the blackened areas are in the image, causing the .jpg file size to alter from around 741 bytes to around 2.5 Kilobytes. But considering how much disk space our computers have, who needs to worry!


Note: These image sizes are for images on a Windows XP
computer
. The size of an image on the NXT is 0.9
Kilobytes (around 900 bytes).


The NXT only displays .ric files, and any imported image will need to be saved as a .ric file before you can use it on the NXT. Once saved as a .ric file, you can use your image through a Display Block:


Note: All images saved through NXT-G 2.0 will be saved to the folder:

C:\Program Files\LEGO
Software
\
LEGO MINDSTORMS NXT\engine\Pictures

where the red writing represemts where you installed NXT-G 2.0 to if you changed any settings during installation.

All images created in the NXT-G 2.0 Image Editor have 100 x 64 pixel dimensions (width by height)

What should I use on my computer?

The .ric files are only useful for users downloading them to their NXT brick. What happens if you want to see what image you are downloading beforehand? You internet browser does not support viewing .ric files, so that leaves .jpg, .png, and .bmp files - which is best? The image file size table shown at the beginning of this post outlined the... file sizes, but what about other differences? Here are some other facts about using images on your computer:

JPG/JPEG
* Use on: Photographs, Realistic Drawings
* Bad results on: Line and Letter Drawings
* Loses detail after every edit - becomes more blurred (check it out using MS paint or similar - on large images, as the .ric files do not show this effect))

PNG
* Use on: Line and Letter Drawings, Clipart, Computer Image Scans (E.g. When using an external scanner to load a piece of paper onto your computer)
* Bad results on: Photographs, Full colour images
* Doesn't lose detail after every edit

All of the above files formats are easily distibuted on the internet as well, as every internet browser can view them.

BMP
* Larger Files

RIC
* NXT-only file, distribute only to other NXT-G 2.0 users, or users with other software supporting .ric files (more to come on this)
* Web browsers will not view them - require download and import into NXT-G 2.0 or other supportive software

More info can be found on the web, a good, simple, but helpful website can be found here:

http://toolkit.crispen.org/formats/index.html

So, in conclusion:

* The NXT can only display .ric images
* No image viewers support .ric files - including internet browsers
* Once an image is saved as a .ric file through the NXT-G 2.0 Image Editor, it can be displayed on the NXT using a Display Block
* Images saved using the NXT-G 2.0 Image Editor can be located on your computer under the LEGO MINDSTORMS NXT\engine\Pictures directory where you installed NXT-G 2.0
* Images created in the NXT-G 2.0 Image Editor have 100 x 64 pixel dimensions
* On the XXT brick, .ric files are about 900 bytes in size

* On your computer, .JPG files have the smallest image size, and .bmp has the largest file size
* Saving an image used on the NXT as any other image file type will not change the content of the picture
* For big images on your computer, .jpg files should be photographs, and png pictures should be text and line drawings
* .JPG files with large dimensions will lose detail and become blurred after every saved edit

Saturday, August 29, 2009

Interger Blocks in NXT-G 2.0

Steve Hassenplug over at TeamHassenplug.org has found a solution to using Interger programming blocks from NXT-G 1.x software in the new NXT-G 2.0 software. NXT-G 2.0 uses Floating Point math blocks unlike previous versions of the software, however Interger blocks are also installed but not available in the programming palletes. First of all, Whats the difference?.. Read On:

Interger Calculations

- E.g. 5, 10, 100, 5567

- Round Number results

- No decimal points

- NXT-G 1.0/1.1


Floating Point Calculations

- E.g. 5.97667, 9547.9767,

- Decimal points

- Large numbers that cannot be represented as intergers

- NXT-G 2.0

Quoting TeamHassenplug:

To add them (Interger Maths Blocks) to a pallet, simply create an empty file in the BlockRegistry directory, in the pallet sub-directory, with the name of the block and a .txt extension.


Ex: [LEGO MINDSTORMS
directory]\engine\EditorVIs\BlockRegistry\Data\Numeric Operations.txt


The list of available blocks is located in: [LEGO MINDSTORMS
directory]\engine\vi.lib\LEGO\Blocks


--> Steve Hassenplug's Solution

Thursday, August 20, 2009

LEGO Education Constructopedia

Hey all, for those of us who are interested in the mechanical design behind some of the great LEGO creations that have appeared throughout the year, and if you have not already done so, check out the LEGO Education Constructopedia. There are some great diagrams and explanations on simple ways we can improve our design skills with the use of gears and pulleys, including compound gearing, changing pully direction and speed, idler gears, and a few other topics which create the 11 pages of engineering tips and tricks.

Saturday, August 15, 2009

LEGO MINDSTORMS NXT-G 2.0 - Remote Control

One of the final new additions to NXT-G 2.0 is the internal Remote Control, lets have a look...


Preliminary Actions


Run NXT-G 2.0


The Remote Control


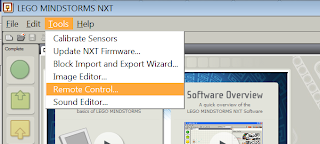
The Remote Control can be located under the 'Tools/Remote Control...' menu in the software package.

Click on this menu option to run the Remote Control. You will know it is loading if the image on the left appears in the middle of your screen.


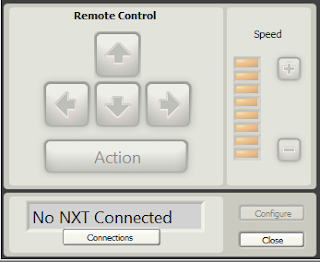
This window will appear - welcome to the Remote Control!

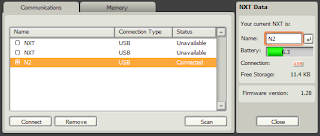
Click on the "Connetions" button to connect a NXT brick to the remote:


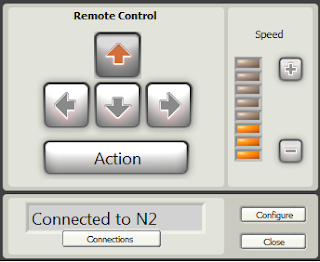
To control your robot, either press the buttons shown on-screen or press the corresponding buttons on your computer's keyboard. To change the speed of the movement motors, use the speed bar on the right of the Remote Control window, '+' will increase the speed, and '-' will decrease it.


Clicking on "Configure" will allow you to specify which motor ports will move the robot, the direction that the movement motors and action motor will rotate, as well as the power of the action motor.


Note that turning left or right will power BOTH the movement motors, while pressing 'Up' or 'Down' will power one of the movement motors. Therefore, the internal remote control in NXT-G 2.0 is best used for cars and other vehicles.


Lastly, you can run a program on the NXT brick while controling the robot from the Remote Control window!

Tuesday, August 4, 2009

Project: Lunar Mineral Sorter (LMS) - Static

This year hosted the celebration of the first moon landing on the 20th July 1969, as well as the release of NXT 2.0 on the 1st August 2009! The LMS (Lunar Mineral Sorter) - Static Edition combines these two events into one NXTLog project buildable using one NXT 2.0 kit!To enhance the collection of available knowledge findable on the Moon, the LMS - SE was designed. once launched from the base shuttle, this stationary robot searches for minerals/rock samples (it can rotate up to 90 degrees left or right), lowers a mechanical arm and grabs the object, followed by scanning the object using the colour sensor to check if it is the object wanted by scientists back on Earth. If so, it is collected, and further objects are searched for. The LMS - SE can collect and hold up to 3 rock samples (aka: zamor balls).

Improvements
--------------------------

* Add a counter-weight onto the claw/grabber
* Possibly reduce the weight of the claw

More information, including CAD and Program files, will be added on the NXTLog page for this project over the next few weeks!

http://mindstorms.lego.com/nxtlog/ProjectDisplay.aspx?id=9ae21e33-e40d-4250-bc99-c24e02b5d7c0

NXTasy Forum Discussion
http://forums.nxtasy.org/index.php?showtopic=4051

Saturday, July 25, 2009

LEGO MINDSTORMS NXT-G 2.0 - Sound Editor

Another new addition to NXT-G 2.0 (the software that comes packed with LEGO MINDSTORMS NXT 2.0) is the Sound Editor Here is a quick guide to its functionality;

Preliminary Actions


Open NXT-G 2.0


Installed a computer Microphone correctly, and can confirm it works by using the Sound Recorder found in Start/Programs/Accessories/Sound Recorder (Example of the Windows 7 Sound Recorder below - you will be able to tell if you are recording if the green bar next to the time is moving).


The Sound Editor

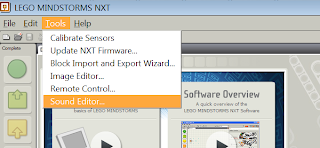
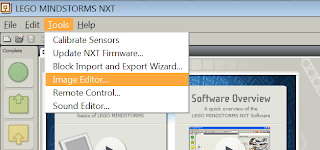
The Sound Editor can be located under the 'Tools/Sound Editor...' menu in the software package.


Click on this menu option to run the Sound Editor. You will know it is loading if the image on the left appears in the middle of your screen.


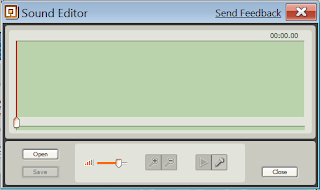
This window will appear - welcome to the Sound Editor!


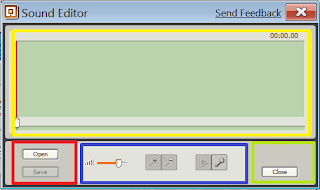
Below is an annotated screenshot of the Sound Editor window:

Yellow Box; The Waveform table. When you are recording waves will appear that show the peaks and and lows of noise level against the time taken for your recording.
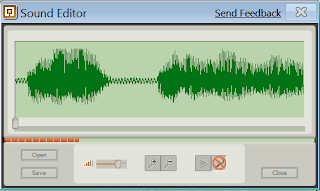

Red Box: This is where the 'Open' and 'Save' options can be accessed. You can open and save in the following formats:


-.RSO
-.WAV
-.MP3


Blue Box: This is where we can change the playback volume of our recording (Only effects the volume level when played back on your PC, and not the overall volume when played back on your NXT brick), zoom in and out of the waveform table (For precise cropping of your recording), and where we can start, stop and play our recording

Green Box: This is where we can close the Sound Editor. Make sure you save before closing.


Recording and Cropping

The Sound Editor will allow you to record for up to ten seconds, of which you will have to crop your wanted sound to under five seconds. while you are recording, the sound Editor will look something like this:


The red and white striped bar below the waveform table shows you how long you have been recording for, and how long you have left (approximately). Also, the recording icon will now have a red circle with a line through it, and its' function will change to 'stop recording'.
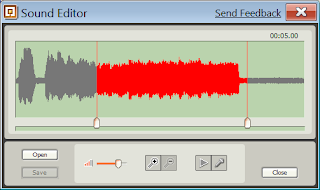
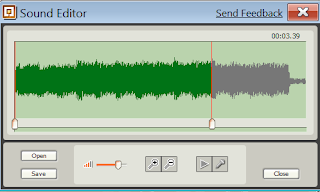
Crop your recording by dragging the two dividers found just below the waveform table to the beginning and end of your wanted selection. The same applies when you have imported a sound. An easy way to tell if you need to crop your recording is if the waves in the wavelength table are red. If your recording is of an acceptable length, the waves will be green, (See pictures below) and the 'Save' function will become active.


Zooming in and Out


Zooming in and out of the waveform table is a great way to help crop a file more precisely. Use the zoom keys (the magnifying glasses) to achieve this. At the standard zoom setting (when you open the Sound Editor) you can move the cropping dividers roughly along every two seconds of recording. When you zoom in, you can move the divider along every one second, achieveing a more accurate selection.


When you zoom in, the waveform table will keep the recording between the dividers in view.

Sunday, July 12, 2009

LEGO MINDSTORMS NXT-G 2.0 - Image Editor

Now I will have a look at the Image Editor included in NXT-G 2.0 (The software that is included in the LEGO MINSTORMS NXT 2.0 kit.)

Preliminary Actions

Run NXT-G 2.0

The Image Editor

The Image Editor can be located under the 'Tools/Image Editor...' menu in the software package.

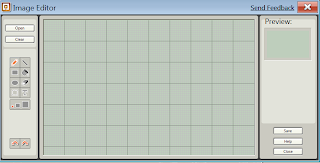
Click on this menu option to run the Image Editor. You will know it is loading if the image on the left appears in the middle of your screen


This window will appear - welcome to the Image Editor!

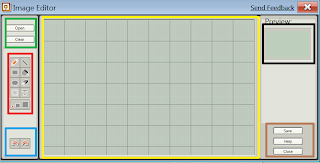
The Image Editor window can be divided into seven areas(Clipboard not shown):


Green Area: This is where we can import an image we would like to have on the NXT brick. The images will be converted into a grayscale format viewable on the NXT brick.
Red Area: This is similar to a MS Paint interface - each button is a different tool for creating/editing images. Notice that unlike Paint, there is no colour pallet - all images on the NXT will be shown in a 'Black and White' style. The tools available are

* Pencil: Allows you to draw freestyle
* Line: Allows you to draw a straight line
* Rectangle: Will help construct a rectangle/square in your image
* Fill: Will fill the desired area with black (Make sure there are no gaps in the edges - otherwise the fill will 'leak' into the rest of the image.
* Elipse: Will help you create a circle/oval shape in your image.
* Erase: Removes unwanted parts of your image.
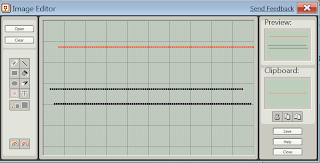
* Clipboard: This tool will allow you to select an area in your image, by dragging a visible, dashed orange box over the area you would like to select (This can also be used just to select and move areas of your image that you have misplaced). Once selected, an extra area will appear in the Image Editor window, and you will be able to cut, copy, and paste your selection into other parts of your image.
* Text: This allows you to type letters and words you would like to appear in your image. If you begin typing in the middle of the image and your typing reaches the side of the editing area, the previous words will start moving towards the left of the editing area so you can fit more in. When your typing reaches both sides, you will be unable to type further on that line.
* Brush Size: This lets you choose the size of the editing brush (small/medium/large)

Blue Area: This is where the Undo and Redo opertaions can be controlled.
Yellow Area: The area where you can edit your image.
Black Area: This is where you image will be previewed as it will appear on your NXT's screen
Brown Area: This is where the 'Save', 'Help', and 'Close' operations are located.

The clipboard window appears between the Black and Brown areas from the previous image (above)


When you are drawing in the editing area, what you are currently drawing before letting go of the left mouse button will be displayed in orange. This is also true when selecting areas of your image for the clipboard, and what you 'paste' into your image.

Compatable images that the editor can open are: .ric (Images created in NXT-G 2.0), .jpg, .jpeg, .png, and .bmp. To save an image as one of those formats, enter the .xxx ending after the filename. (This also works in NXT-G 2.0 if you would like to save the output as something other than .ric)

Useful Shortcuts:
(All shortcuts do not require you to press the '+' symbol)

Ctrl + O : Opens a window to browse for images you would like to import.
Ctrl + S : Save your image
Ctrl + H : Will open both a web browser window containing the help file for the editor, as well as a 'Context Window" - hovering your mouse above an item you are unsure about will result in information being shown in this window (Usually the name and possibly a description of the item you enquired about)
Ctrl + Z : Undo
Ctrl + X : "Cuts" a selected area
Ctrl + C : Copies a selected area into the clipboard
Ctrl + V : Pastes a selected area copied into the clipboard