Many NXT users would enjoy the ability to control their creations remotely via a PC. The new NXT-G 2.0 software tries to cater for this segment of people by introducing a new in-program Remote Control (as discussed here). However, only people who own a NXT 2.0 Retail kit have access to this function – what about NXT 1.0 users? Lets have a look at a few alternatives found within BricxCC – a free LEGO MINDSTORMS programming suite created by John Hansen;

Brick Joystick (BricxCC Utility)
 This program can be found within BricxCC - and NeXT Tools for Mac OS X - and allows users to control their robots using their PC’s mouse, keyboard, or even a joystick! The arrow buttons at the top control the direction that the robot will travel. Holding a left-click, or performing a single right click on one of these buttons will move your robot in that direction. You can also use the numeric pad found on the right side of your keyboard (with Numlock on) to control your robot; with all the program’s arrow buttons relative to the number ‘5’ keyboard button (the “Stop” function in this case). Ignore the ‘T1’ and ‘T2’ buttons at the moment – they only work on the RCX.
The box below the direction controls allows you to specify the type of steering, or ‘Drive Mode’, of your robot. The “Left-Right” function uses your robot’s left and right motors to move and steer, whilst the “Drive-Steer” function uses one motor on your robot to move forward and backward, and a second motor to steer the robot left and right. Select which steering design you have used in your robot to use the remote correctly.
The final three boxes allow you to control other aspects of the motors that control the movement of your robot. The “Left Motor/Drive Motor” and “Right Motor/Steer motor” (Left-Right/Drive-Steer modes) boxes allow you to set the Port Number and direction that your motors are facing. The Speed slider in the bottom box allows you to specify the speed that all of your motors will move at.
Remote (BricxCC Utility)
 Another tool found within BricxCC and the Mac equivalent is the ‘Remote’ tool. This tool is useful if you wish to activate programs on the NXT while you control it remotely from your computer, or if you want more specific control over each motor (including the third motor inaccessible in the Brick Joystick program above). From the top of the remote down;
The message buttons are for the RCX and Scout bricks, so ignore them.
The ‘A’, ‘B’ and ‘C’ boxes control the motors of your robot (the letters refer to the motor ports). The buttons on the top of the sliders drive the selected motor forward, and the button on the bottom of the sliders will drive the selected motor backward. The actual sliders control the speed of each motor.
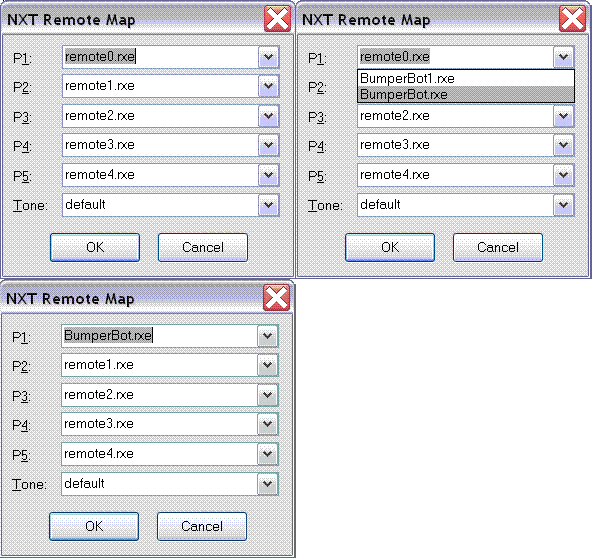
The five program buttons allow you to start a program currently on the NXT brick remotely. First of all, you need to map the programs with the program buttons. Right click any of the program buttons to open the “NXT Remote Map” window. Then click on the drop-down menus to select from a list of programs that must already be on the NXT brick. Click the ‘OK’ button to finalize your selections. Now you can left-click the mapped program buttons to start programs on the NXT!

The ‘Stop’ button stops the program currently running on the brick.
The ‘Tone’ button allows you to play a sound file on the NXT remotely. The default sound is a simple ‘beep’, but a NXT sound file can be mapped onto the button by following the same method as the ‘Program’ buttons. The sound files need to be on the NXT brick before you can select them. Left-clicking the ‘Tone’ button will play the selected sound file. Remember to turn the volume up on your NXT brick before you use this feature!
---------------------------------------------------------------------------------
These are just two other methods available for NXT users to operate their creations remotely. Both programs come free with John Hansen’s “BricxCC” and “NeXT Tools for Mac OS X” packages. Another alternative is to use a remote requiring Microsoft Robotics Studio – see Mathias Paul Scholz's website for more details.


